Hardwood floors have long been the hallmark of beauty and resilience in home layout. Whether you are redesigning an existing space or creating a brand-new home, the ideal hardwood flooring installment can substantially enhance your property's visual allure and value. Nonetheless, numerous homeowners find themselves overwhelmed by the complexities of this task. That's where The Total Checklist for a Successful Wood Flooring Installment Project enters play!
In this extensive overview, we'll walk you through every step of the hardwood flooring installation procedure. From preparation and preparation to post-installation care, we have actually obtained all your bases covered. So roll up your sleeves and get ready to study the fundamentals of hardwood flooring!
Understanding Wood Floor covering Types
1. Strong vs Engineered Hardwood: What's the Difference?
When taking into consideration hardwood floor installment, one essential decision is whether to select strong or crafted hardwood.
- Solid Hardwood: This kind contains 100% natural wood and is understood for its durability. It can be sanded and refinished multiple times, making it a preferred amongst homeowners. Engineered Wood: Made with layers of plywood topped with a veneer of real wood, engineered wood is extra immune to wetness and temperature level modifications. This makes it ideal for basements or locations with varying humidity levels.
2. Choosing the Right Timber Species
Different timber species offer varying degrees of firmness, color, grain patterns, and expenses:
- Oak: Popular for its resilience and traditional look. Maple: Provides a light color and fine grain. Cherry: Known for its rich shade that dims over time.
Choosing the ideal types will not only impact aesthetic appeals however likewise durability and maintenance.
Planning Phase: Prepping for Your Installment Project
3. Setting a Budget for Your Hardwood Floor Installation
Before diving right into product choice and contractor hiring, identify your spending plan:
|Item|Approximated Cost|| ----------------------------|----------------|| Material|$3 - $12 per sq ft|| Labor|$3 - $8 per sq ft|| Added Supplies|$500 - $1,000|
Remember that buying top quality products might conserve you money on repairs down the line.
4. Determining Your Room Correctly
Proper measurement is essential-- below's how you do it:
Measure the size and size of each room. Multiply these numbers for complete square footage. Add 10% added to make up waste during installation.5. Selecting a Trustworthy Contractor
Finding somebody who understands their method around wood floor setup is crucial:
- Check online reviews Ask friends or family members for recommendations Verify licenses and insurance
Preparation Steps Before Installation Begins
6. Accommodating Your Timber Flooring
Before installment, it's essential to accommodate your wood floor covering:
Store your planks in the space where they'll be installed. Leave them there for a minimum of three days.This permits them to adjust to moisture and temperature level degrees in your home.
7. Preparing the Subfloor
The subfloor should be tidy, dry, and degree before mounting wood floors:
- Remove carpet or old flooring. Repair any kind of splits or gaps. Ensure wetness levels serve (listed below 12%).
8. Planning Installation Layout
Decide on which direction your boards will lay based on light sources or space shape:
- Long areas must have boards running alongside the lengthiest wall.
This visual method can make spaces really feel larger than they are!
The Setup Refine: Detailed Guide
9. Collecting Needed Tools and Materials
Here's what you'll require:
- Circular saw Hammer Nail gun Tape measure Level Flooring adhesive (if called for)
Make sure all tools remain in excellent functioning problem before starting.
10. Setting Up Underlayment (If Called for)
In some cases, underlayment assists with insulation and sound absorption:
Roll out underlayment throughout the whole subfloor. Overlap seams by around 6 inches.This action can be critical if you're taking care of sound issues!
11. Beginning Your Initial Row
Begin setting your first row along the longest wall surface:
Use spacers in between planks and walls (generally 1/4 inch). Secure using nails or sticky as needed.Proper placement below establishes you up for success later on!
12. Proceeding with Subsequent Rows
As you lay succeeding rows:
Stagger joints by at the very least six inches. Use touching blocks to guarantee limited seams without harmful edges.A little additional treatment currently will certainly repay later regarding aesthetics!
13. Final Row Adjustments & Trimming Edges
You might need to trim down your last row because of space restraints:
- Measure carefully!
Simply cut items as needed while keeping growth spaces along walls.
Finishing Touches After Installation
14. Setting Up Baseboards & Trimwork
Once your floor covering is mounted:
Reattach walls around perimeter walls. Consider shoe molding if preferred for added finish.These elements help conceal development spaces while providing a refined look!
15: Tidying up Post-installation Messes
After setup comes clean-up! Below's just how to tackle it effectively:
Vacuum completely to remove dust from cuts. Wipe down surface areas with a wet fabric to catch any kind of remaining debris.A clean area not only looks far better however likewise feels fresh!
Post-installation Treatment: Preserving Your New Floors
16: Normal Cleansing Tips for Hardwood Floors
Keeping those floorings looking excellent needs regular upkeep:
Sweep daily with a microfiber mop. Use ideal cleansers created particularly for hardwood.Avoid rough chemicals that could strip finishes!
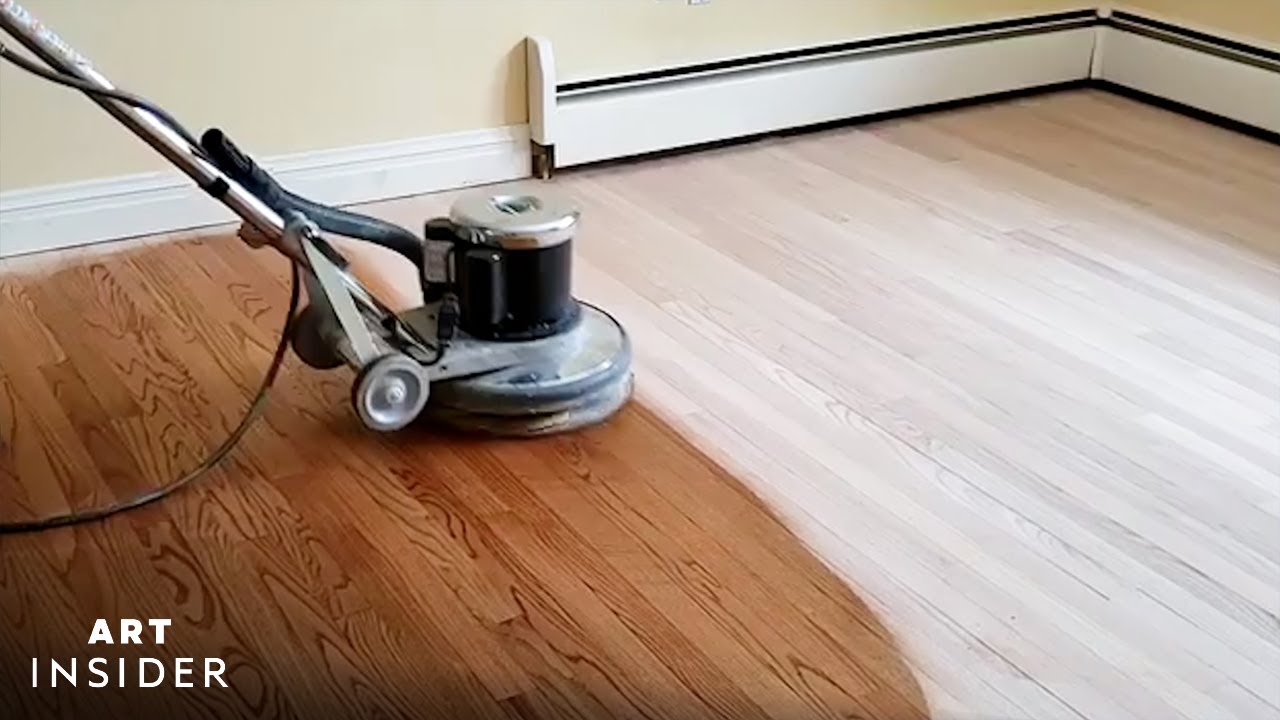
17: When Ought to You Redecorate Your Hardwood Floors?
Over time-- despite proper upkeep-- your floorings may require refinishing:
Signs include:
- Dullness regardless of regular cleaning Scratches that come to be more noticeable
Refinishing can rejuvenate damaged floors!
FAQs About Hardwood Flooring
18: For how long Does Hardwood Flooring Installation Take?
Typically, an entire installation task takes anywhere from eventually as much as a number of days relying on space dimension and complexity of layout.
Answer: Normally talking, the majority of setups can be finished in about one day; nevertheless, it depends upon aspects like size of area being covered in addition to any preparatory job called for ahead of time such as removing old flooring or making subfloor repairs.
19: Can I Install Wood Floors Myself?
While do it yourself setups are possible if you come in handy with tools; employing experts makes sure high quality work will conserve migraines later on down roadway specifically when dealing things like leveling subfloors properly!
Answer: Yes! If you're skilled sufficient in do it yourself jobs; nevertheless hiring pros may conserve time plus guarantee top quality results without hiccups throughout process.
20: What Sort of Upkeep Do Wood Floors Need?
Regular sweeping/vacuuming plus occasional mopping making use of suitable items advised by makers ensures longevity plus excellent appearance over time!
Answer: Regular cleaning entails sweeping/vacuuming weekly plus damp wiping regular monthly using products especially designed secure effective keep wooden surfaces.
21: Will certainly My Animals Damages My New Floors?
Pets can scratch wood surfaces; nevertheless choosing tougher varieties such as oak or maple minimize likelihood substantial damages happening with time while ensuring continuous satisfaction throughout years!
Answer: Not always; choosing more difficult woods reduces danger while offering durability versus wear triggered by claws etc, but always consider having actually rugs/mats put vital areas shield against scratches.
22: How Can I Protect Against Scrapes on My Brand-new Floors?
Using furnishings pads under legs protects against damaging from activity; regular cleaning additionally assists maintain dirt/grit away which adds wear as well!
Answer: Placing safety pads under furniture legs integrated regular cleansing assists reduce opportunities scratches happening while improving overall aesthetics!
Conclusion
With cautious preparation, execution, upkeep-- and probably even some elbow grease-- you'll have lovely hardwood floors that last generations! By following our comprehensive overview labelled "The Total Checklist for an Effective Wood Flooring Setup Task," you're https://gregoryjepk908.raidersfanteamshop.com/the-cost-of-hardwood-floor-setup-vs-refinishing-making-an-informed-decision bound to appreciate both visual allure along with useful benefits offered via durable premium products chosen intelligently customized details requirements choices personal style choices made throughout entire process-- from first decisions right through ended up item provided end goal achieved successfully recognized desires come to life within homes live love grow with each other happily ever before after!